
You are now reading the first episode of the Music Production Series!
This series is for anyone who is interested in learning more about the basics and the more advanced stuff of music production. I will try to not lengthen episodes too much to keep it short and powerful. As I progress through the episodes I will start to discuss the more ‘hard’ and technical stuff gradually. This series is not necessarily destined to end, it could very well be that it keeps on going; for the simple fact that a human’s learning curve when it comes to something so varied is potentially endless. However, the goal of this series is to up the level of your producing mind and each episode will cover a lot of useful and interesting topics! Note: the author works with Fruity Loops but the knowledge shared in this series mostly applies to all audio workstations.

In this first episode we are going to cover some basics of mixing and balancing your track and we are going to talk a bit about layouts for creating a balanced mix for a track. Note: the types of structures, set-ups, layouts and balances of tracks are endless and in the end a big part of it is based on taste and the type of genre, so do bare in mind this article is based on the experience(s) and vision(s) of the author!
Welcome!
When your track is finished, the usual process is to get it mastered or to master it yourself. For those who don’t know what mastering is: Your track (the final mix) will go through a process of finalization. So basically the mix will be filtered as a whole, the dynamics will be enhanced and the loudness (most of the times) will be boosted. The mastering process can have a huge impact on your track and can make the experience of a listener way richer.

But…
we’re not quite at the mastering process yet. Ideally you want your mix to be so good and balanced that the mastering process can be executed in its most natural way. You don’t want yourself or a sound designer to have to compensate for issues in the original mix.
From my own experience I found that the quality of your final mix (and the absolute final after mastering) can be measured in a couple of ways. One of these ways is checking for ‘pain-borders’. You don’t want your mix to have to be played on a lower volume than people want to, simply because there are sounds that are to edgy and generate unpleasant frequencies. In later episodes we are going to go a bit more in depth on how to filter your sounds so they are clean, crisp, clear and don’t excite the pain-border. But firstly I want to give a tip: play your mix very loudly through your speakers and headset. In this way you can notice way more, especially if sounds are to edgy. Ideally you want to be able to play your mix loudly and still have a crystal clear and dynamic experience, without sounds crossing the pain-border.

A completely balanced mix is a tough one. Again, a lot of it is preference. There are a few key points that can help you out a lot though:
* Don’t overkill the amount of bass in your track.
* Make sure there isn’t a sound to dominant (loud) and jumps to far out of the mix.
So, now we have a better picture of what you should be looking for. Now, lets go a bit more in depth. Some things I might fly by quickly. Certain functions I describe are managed differently per music software, but the core essence is the same!
1. Panning your sounds.
Panning is an option where instead of a sound being in the middle of your headset/speakers, you can make it go a bit or way more to the left or right. You can create your own balance, for example 80 percent through the left and 20 percent through the right. Panning sounds can create a nice ‘field of sound’ in your tracks. Sounds have to fight less over their position and can have their own respective field!
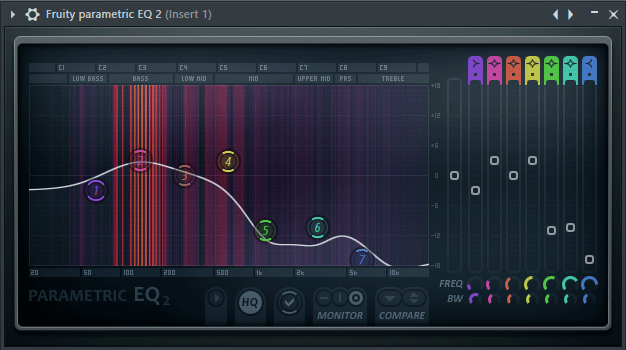
2. Equalizing your sounds.
Equalizer tools are software plugins that most music production programs have and can be additionally bought or downloaded. With most equalizers you have a view where you can see the frequencies of sound. From the lowest frequencies like sub-bass to the very high frequencies like hi-hats and white noise. Above I described that creating a good mix means there are no sounds crossing the pain-borders. Well, an equalizer will help you with that a lot! You can manipulate the frequencies of a specific sound in detail. Example: you might have a nice snare but you feel there is a messy effect in it. – The equalizer will allow you to find where that is occurring and you can manipulate that spectrum until the messy effect is gone!
- An equalizer can be loaded into a channel of your mixer as a filter-tool, which then can be utilized to filter a specific sound.
In further episodes I am going to go in depth on the topic of equalizing and I will provide the reader with neat tricks; about finding Sweet-spots, working around Pain-borders and creating nice layering between sounds, simply by equalizing them all!
3. Get rid of a Muddy Bass.
A ‘muddy bass sequence’ means that there is to much messy disturbance in the bass of your track when you’re listening to it. For example, this can occur when you have a kick and a bass-line fighting over their position. Their bass-frequencies can be stacking up and creating the ‘muddy effect’. A balanced mix means that also the bass sequence sounds clean and clear. Lets take the ‘kick and bass-line example’.. as an example! A good trick is to check in what frequency the bass-line resonates (in your equalizer) and to also check that for the kick. You will find that most of the time there is a lot of overlap in frequency, causing the effect of ‘stacking’; creating muddy effects. Try to find a frequency where you want your kick and bass to be in, and try to minimize the ‘stacking frequencies’. This will generate a field of sound where your kick and bass don’t have to fight over a spot! In another episode I will provide a detailed tutorial about resolving muddy bass!
Hey,
I’m not going to make this episode very long – lots of thoughts about producing pop up and I want to go in detail about a lot of stuff, but I don’t want to bore the reader to much with long monologues. – Definitely stay tuned if you’ve enjoyed this episode, more to come!
Have a great day.