So here we are with Serum Wavetable Design part 2 (finally). In part 1 we imported sounds, pictures and drew our own wavetables. Now we dive into the editor to polish these wavetables so they’re ready to use! If you have any questions about Xfer Serum and/or this tutorial; feel free to ask them in the comment section below.
When you’ve imported a sample in one of Serum’s oscillators, chances are that your wavetable sounds very choppy or glitchy when scrolling through the different frames. It also may be that the last frames are silent and useless. There are multiple ways to counter these problems, this tutorial covers my general workflow and the features you will probably need/use the most.
Step 1: Choose your Wavetable frames.
With the wavetable position knob (WT POS) you can scroll through all the wavetable frames. There are 2 ways to approach this step. You can either choose which frames or section you like best, or which you don’t like and want to remove. The number you see when turning the WT POS is the frame-number you’re at. Try to only listen to the way a frame or section sounds, the choppiness will be dealt with at step 2.
Open up the editor by hitting the pencil icon on the top right. At the bottom of this screen you’ll see all the frames your wavetable has. To remove any unwanted frames simply hold down Shift and select all the frames you want to delete. Then at the top menu got to “Add/Remove” and select the option “Remove: Multi-selection”. You can also select the frames you want to keep and choose for “Remove All (Except Selected)”.
You can choose as many as you want. I often go for 2 to 10 frames, so they will fade better at the next step. But if you’re looking for some growly, acid glitch sounds, you probably want to keep more.

Step 2: Filling in the blanks.
As you may know, a single wavetable can contain 256 frames. But now you have around 10 frames and it sounds choppy when you move the wavetable position. Serum can fill in the blanks for you and generate all the remaining frames, which is called “morphing”.
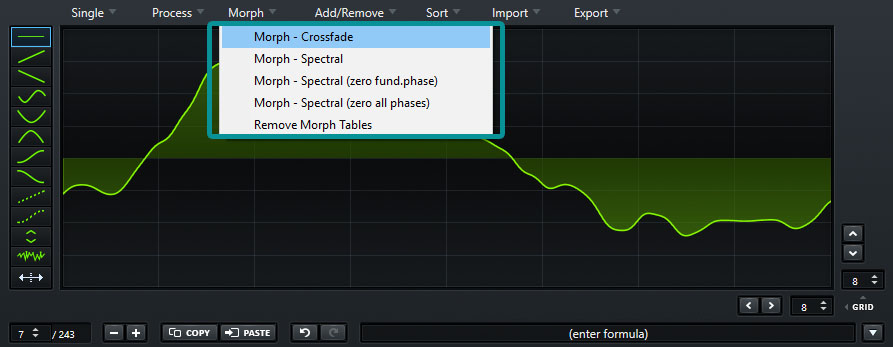
The “Morph – Crossfade” option is the most default option. This generates all frames in between existing frames, based on the existing frames. This is also the one I use the most.
The “Morph – Spectral” option generates the frames in between based on the spectral and phase information of those frames (like an additive synth). Quite often this results in almost the same result as using crossfade. However, the “Morph – Spectral (zero all phases)” often gives you a totally different result since it will also change the properties of existing frames. But it’s fun to experiment with.
Serum can fill in the blanks for you and generate all the remaining frames, which is called “morphing”.
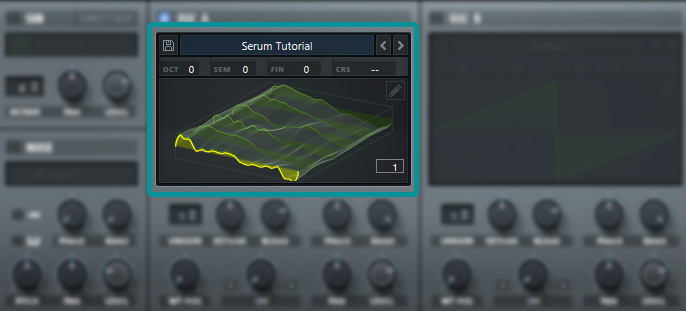
Now you’ll see that the numbers of your frames have increased. If you go back to the oscillators, you can see an overview of your wavetable. All the hard green lines are your frames, the light green is filled in by Serum. The transactions of the wavetable frames will now sound smooth.
Step 3: Increase the wavetable volume.
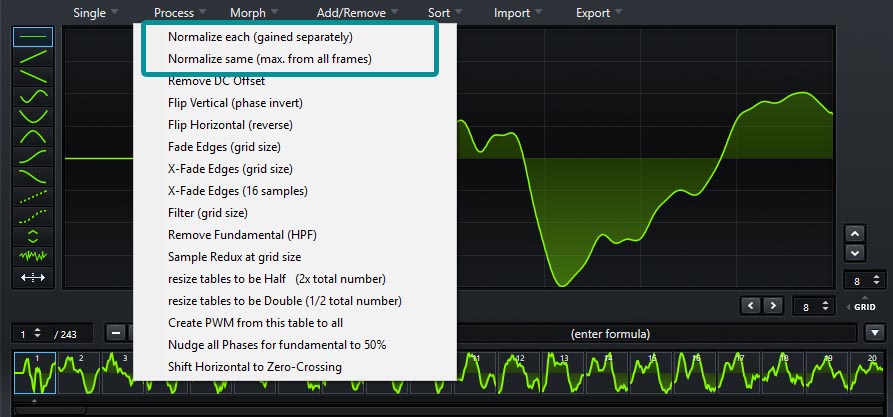
To boost the volume (loudness) of a wavetable you need to hit “Normalize Each (gained separately)” at the “Process” menu.
Sometimes it is nice to have a bit of volume change in a wavetable, and you don’t want every frame to be maxed out. Then choose “Normalize Each (max. from all frames)” but this will do nothing when there are already frames on max volume. So mostly I will boost all frames to the same volume.
Step 4: Smoothen and finish the sound of a wavetable.
Depending on the source you used for your wavetable and the number of frames, it can still sound a bit harsh. When this isn’t what you’re aiming for, there are ways to smoothen your wavetable. These features can be found at the “Process” menu.
Fade Edges (grid size) – The start and end of each frame will be brought to the horizontal center line, based on the size of your grid (which you can set in the bottom-right corner of the editor). Sometimes this will alter your sound a lot.
X-Fade Edges (grid size) – This will do the same as “Fade Edges”, but will fade the end of a frame to the start of the next frame. The start of each frame will also be faded to the end of the previous frame.
X-Fade Edges (16 samples) – This will do the same as above but on 16 samples of the frame (waveform). That’s basically a really small grid size.
Filter (grid size) – This is a Low Pass Filter (LPF), so it will remove the high frequencies. Use this when you want to get rid of the harsh/buzzy sound of your wavetable. Increasing the horizontal grid size will increase the amount of frequencies the LPF lets through. So use this as a cutoff-knob. To help you understand: when the horizontal grid size is set to 0, you will get a sinus waveform. I use this feature a lot, mostly when creating ambient presets for Serum.
Remove Fundamental (HPF) – This is a High Pass Filter (HPF) and does the opposite of the Filter described above. (It removes the lower frequencies).
Sample Redux at grid size – This feature acts like a bitcrusher; it reduces the sample rate based on the grid size. The higher the value of the horizontal grid size, the more sample rate reduction is applied. See images below.

Wavetable frame without sample redux 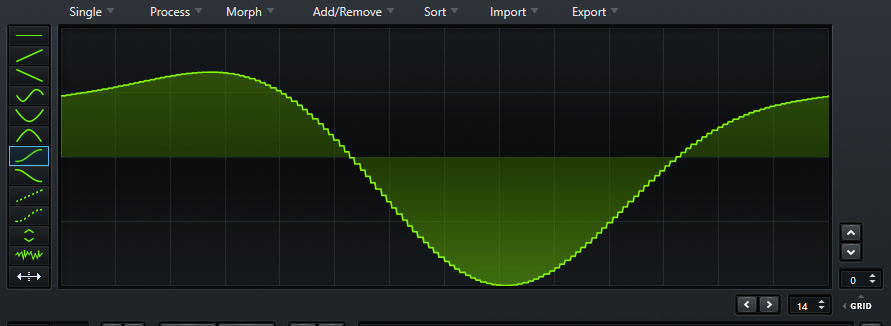
Wavetable frame with sample redux with grid on 14 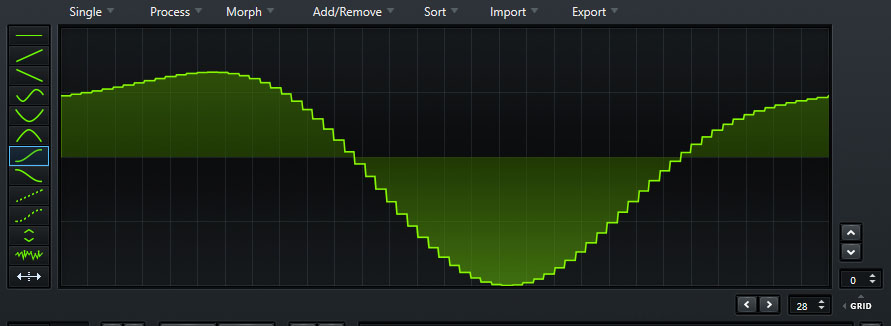
Wavetable frame with sample redux with grid on 28
5 Tips & Tricks for Wavetable Editor
Here are some extra tips and tricks for using Serum’s wavetable editor:
- Use the Undo en Redo buttons since ctrl-z will not work. Using ctrl-z will undo your latest action in your DAW (at least it does in FL Studio)
- All the process options of step 4 and 5 can also be applied to a single wavetable frame by using the “Single” menu.
- At the top left view of the editor you can switch between oscillator A and B. Don’t forget to turn them on or off.
- When you want to change the order of the frames, you can drag and drop them or use one of the sorting options in the “Sort” menu.
- When you’re editing the wavetable position transitions, add an LFO to the WT POS knob. So that every time you hit a key, you’ll hear the transitions and the effects of your edits.
- Don’t forget to save your wavetables. You can find the save icon at the top left of the oscillator view.
Conclusion
As said, this tutorial describes the wavetable editor features I use the most. There’s a lot more to discover in Serum‘s wavetable editor and the vst plugin itself. I will definitely cover more subjects and features since it’s my favorite plugin. Check out part one on how to create a wavetable here, or check our Free Serum Presets or Pay-What-You-Want Premium Serum Presets.
If you have any questions or requests please feel free to comment below.