Wavetables are the base of your sound and all the filters, LFOs and modulations will shape your sound. However, it’s very important to start with the right/best wavetable so that you can create the sound that you are looking for more easily. There are multiple ways to create your own wavetable for Serum. This article will give you insight in 4 different techniques available and how to use them. Part 2 shows you how to polish and finish your wavetables. Since every wavetable that you make with these methods will probably need to be customized a bit to get perfect.
What are wavetables?
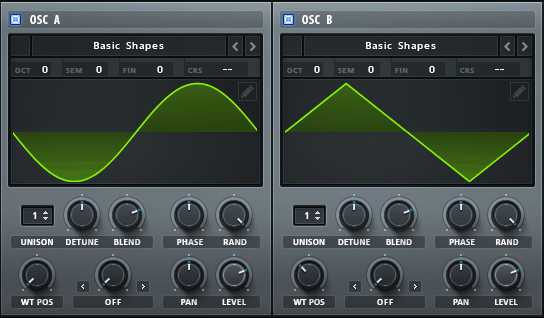
Just like almost any synth, Serum has oscillators. These oscillators use wavetables to define the sound that they make, which means they are the base of your sound. You probably are familiar with a sine or triangle oscillator, see image. What you see in this image is 1 single frame of 2 wavetables (osc A and osc B). A wavetable in Serum contains a maximum of 256 frames. So basically, 1 oscillator can produce 256 different sounds.
Method 1: Import a sound/sample as a wavetable.
This is probably the most used method to create wavetables in Serum. There are multiple ways to use a sound or sample. You can drag & drop it on one of the oscillators. But before dropping your sample on the oscillator screen, hold your mouse button and choose one of the options. The top three options I use the most, because you can choose what Serum does with the pitch. The bottom 4 (FFT) are the best for vocals and drums. Especially when you want to hear what the vocal says when scrolling through the wavetable position.
There’s a lot to say about all these options and which audio to use them for but just play around with these different import options and see what kind of results you get. To help you out, here are my basic rules to understand what each option does.
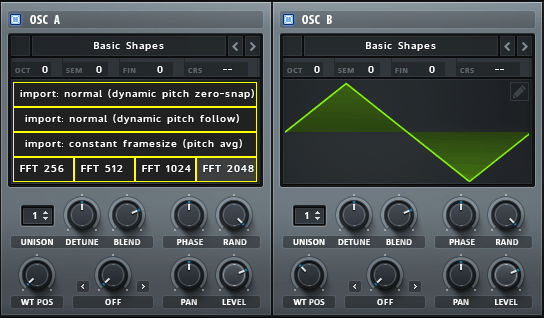
Normal (Dynamic Pitch Zero Snap) – Best for simple/basic samples with slight pitch shifting (I don’t use this one often).
Normal (Dynamic Pitch Follow) – This option is best for the more complex samples with pitch shifting.
Constant Framesize (Pitch avg) – Best for samples with a constant pitch, since Serum will grab the average pitch of the sample.
FFT 256, 512, 1024 and 2048 – Choose one of these for drum hits and vocals. The longer the duration of the sample is, the higher the FFT for best results.
Note: These are my general rules on how I use these options. You can use any option for any sample. Don’t feel limited to these rules; just check what the results are by experimenting. Try any sound or sample you like; from your own voice to your favorite bass. It’s all possible!
But wait! There’s more!
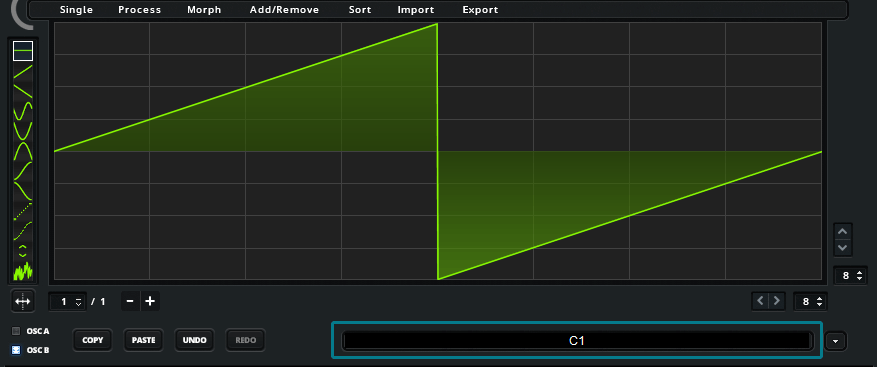
Besides dragging and dropping your sample directly on the oscillator, you can also drag your sample into the wavetable editor. I use this feature when I know the pitch of the sample, for example a synth hit at C1.
Simply open the wavetable editor and click on formula. There you can enter the note of the sample, in this example C1. Hit enter and now drag and drop your sample.
Method 2: Import images.
Since Serum 1.4 it is possible to use images as wavetables. You have to use PNG images and can easily drag & drop them on the oscillator like audio samples. There will be some unusable frames at the beginning and end, so just delete those. To learn more about importing images in Serum, read our article: How to Import Images as Wavetables in Serum.
Method 3: Draw your own wavetable.
I like this method a lot to create simple wavetables, because sometimes you don’t need a complex wavetable. However, this method is not limited to simple/basic wavetables.
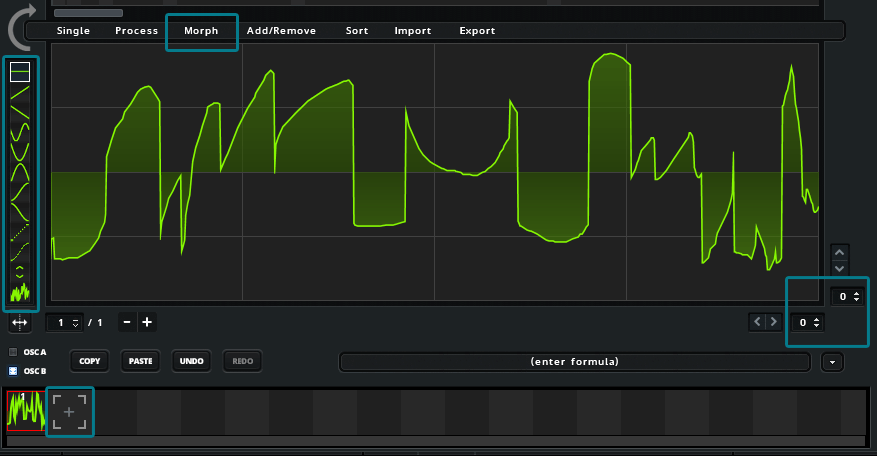
Go to the wavetable editor. On your left you will see a bunch of tools to create different styles of lines. The default grid value is 8 (the amount of squares you have to draw in). On the lower right corner you can adjust the value – the higher this value, the more squares you have to draw in.
When u decrease the grid value to 0, there’s no grid that gives you 100% artistic freedom. Grab the line tool and paint whatever you want! There are 12 drawing tools to use, for the sake of the length of this tutorial I will not explain them, but I will probably make an article about that later.
When you’ve created your first frame, hit the + icon at the bottom of the wavetable editor and it copies your frame. Now you can make adjustments and go to the next. When you have 2 or more frames you can complete your wavetable by choosing for Morph -> Crossfade or Spectral. These options will fill in all the empty frames in between the ones you created, making a full 256 frames wavetable. Note: these frames will not show in the editor, but they will be in your oscillator! More about finishing your wavetable in the next episode.
Method 4: Using Warp Mode
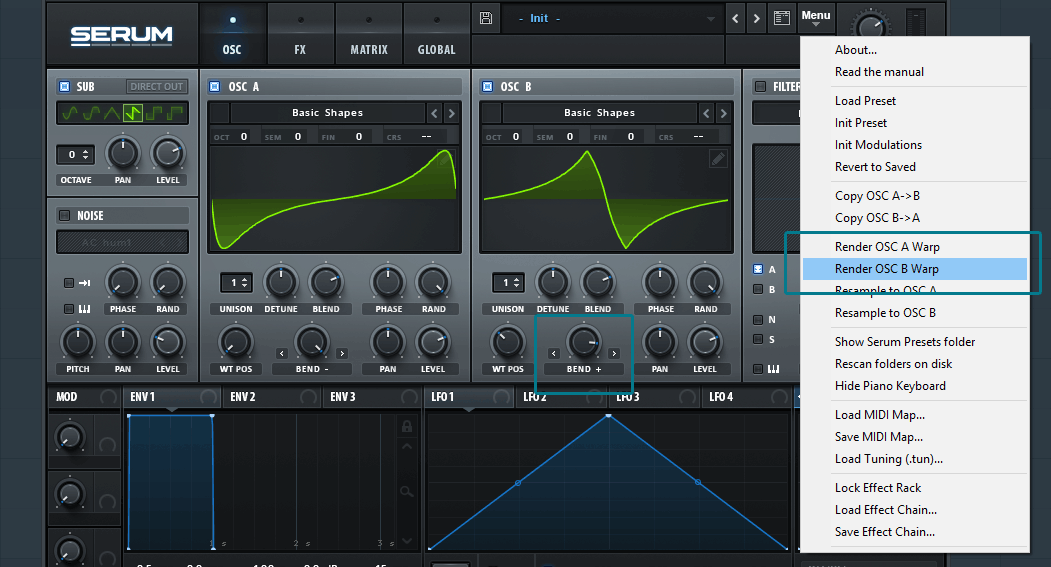
The Warp mode is in the OSC tab of Serum. Here you can choose a bunch of different modes to alter you wavetable. These modes can bend your current frame, mirror it and much more. This is pretty basic and you probably already know this. However what I don’t see often in tutorials and articles is that Serum has an option to create wavetables with your selected warp mode.
When you’ve selected a wavetable position/frame and a warp mode, you can go to Menu -> Render OSC A Warp (or B of course, depending on the oscillator you’re working in). This will render the complete warp mode, 0 to 100%, to a new complete wavetable. It will use the current wavetable position, replacing all the other frames.
You can now turn it off or use another warp mode to further customize your wavetable.
Mix the methods!
Of course it is possible to mix the different techniques and methods to get your own, unique wavetables. I really recommend you to do this so that you master the art of wavetable design! It’s the basis of your Serum preset and a good starting point is half the work!
Part 2 of Serum Wavetable Design is be about polishing and finishing your wavetable!
so… part 2?
Hi Steve! It’s been a long wait, but here’s part 2:
https://typhonicsamples.com/blog/tutorials/serum-wavetable-design-2-2-create-your-own-wavetable
If you’ve any questions, please let me know.
Thank you for this. Very descriptive, fun and full of info! I’m new-ish to Serum, was looking for presets to build off of, saw “wavetables” included with them which lead me here.
Glad you like it! If you’ve any questions, please let me know.
Check out all our free Serum download here:
https://typhonicsamples.com/free-samples-presets/free-xfer-serum-presets
More coming soon 🙂
Good article, just wanted to point out that AFAIK sinus belongs in the nose – that’s a sine wave. Additionally the other one is a triangle wave, not a saw wave
Hey Karl,
Thanks for your response, I think I goofed off there.. In my native language a sine wave is called “sinus”, and I can’t understand why I called it a saw haha. Thanks for pointing it out, I’ve edited the text.